allheart55 (Cindy E)
Administrator

This post was originally published on Oct. 31, 2009, and updated on Aug. 7, 2014, by Brandon Widder. The following instructions now pertain to BitLocker as our previous software choice, TrueCrypt, is no longer available. Michael Brown and Emily Schiola contributed to this post.
In this day and age, we all know backing up your files is important (and easy given the cloud). However, what happens if your desktop computer is unexpectedly stolen, or your leave your premium notebook at the local coffee shop? Although it’s a scenario you likely don’t want to think about, it’s also one you’ll likely encounter at some point during the course of your lifetime.
A thoroughly executed back-up plan can alleviate data loss, but unfortunately, you also don’t want random strangers perusing the highly personal information you’ve stockpiled on your machine over the last three years.
Fortunately, there is more than one way to protect your precious information from falling into the wrong hands — or at least keep unwanted hands from accessing said information without your approval. Protecting your files is essentially a two-step process. Not only does it require you to properly encrypt the data on your hard drive so you can control access via passwords, but it also involves completely wiping your hard drive to prevent others from retrieving your data once you decide it’s time to put your personal machine out to pasture.
Here is our guide on how to erase a hard drive and encrypt your files using the freemium BitLocker, DiskCryptor, and Active@KillDisk. We can’t guarantee it will keep the most tech-savvy thief from obtaining your information, but it sure as hell will make things a bit more difficult.
How to encrypt your files using BitLocker
One of the best ways to secure your private data is to encrypt it on your hard drive. Encryption software uses an algorithm to scramble data in such a way that it can be read only by someone who possesses the special key that’s required to descramble it. Although the Internet is peppered with third-party applications for encrypting your hard drive, Microsoft’s BitLocker remains one of the most viable options given the software comes standard on Windows Vista, 7, and any Windows operating system later than 8.1.
Once you set up a recovery password, the simple program will automatically password protect everything from documents to entire drives, shielding your data from prying eyes in the process.
Assuming you have the Ultimate or Enterprise version of Windows 7, Vista, or 8 — along with a Trusted Platform Module (TPM) chip — simply launch BitLocker.
To do so, access the Start menu, select the Control Panel option, followed by System and Security. Afterward, select BitLocker Drive Encryption and click the blue Turn On BitLocker link before launching into the on-screen wizard. Also, don’t fret if you’re not sure if you’re computer possess the necessary requirements for the software — BitLocker will let you know if it doesn’t.

Follow the instructional wizard until you reach the final step. Stay away from names and birthdays when it comes time to choose a recovery password, and instead, opt for something that is a mix of letters, numbers, and symbols as outlined in our guide to choosing a strong password.
Though likely a pain to remember, keep it more than 20 characters to ensure the utmost security. Once finished, the utility will automatically encrypt any file you save to the drive, thus restricting access to the file without the proper password.
How to encrypt your files using DiskCryptor
Although BitLocker may not be compatible with your machine or OS, there’s a good chance the open-source DiskCryptor is. Best of all, the freemium utility can encrypt entire drives — including the one on which Windows is installed — without requiring you to format your Windows drive akin to most other encryption software.
Sure, you may have to enter a designated password to launch the software every time you boot your computer, but it’s a small price to pay for across-the-board protection.
To enable DiskCryptor, first navigate to the software’s respective download page and click the blue installer link on the left-hand side corresponding to the latest software build. Afterward, launch the software accept the resulting software agreement, and follow the on-screen wizard before restarting your computer.

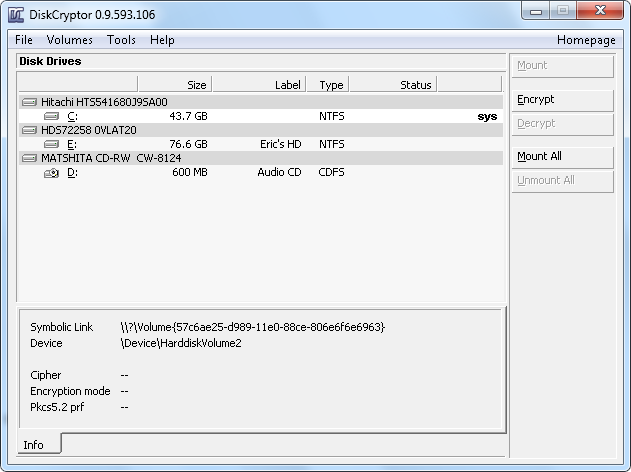
Launch DiskCryptor again after restarting your computer, select the system drive you wish to encrypt — typically C: — and click the gray Encrypt button on the right-hand side of the application window.
Though you can adjust the various encryption options afterward, we recommend simply clicking through the resulting prompts using DiskCryptor’s default options. Stay away from names and birthdays when it comes time to choose a recovery password, and instead, opt for something that is a mix of letters, numbers, and symbols as outlined in our guide to choosing a strong password.
Though likely a pain to remember, keep it more than 20 characters to ensure the utmost security. The utility will then begin encrypting your requested drive, and once encrypted, the drive will listed as “mounted” beneath the Status column. You may not be able to use outside utilities (LiveCDs, USB drives, etc.) without first decrypting the system drive, but in the meantime, you’re files will remain under password protection.
How to erase your hard drive using Active@KillDisk
When your PC (or its hard drive) has reached the end of its useful life, you should remove all traces of your personal information before sending it into retirement; especially if your disposal plan entails donating it to someone whose computing needs are more modest than yours.
Simply deleting the files isn’t good enough, even if you empty the PC’s recycle bin. All that really does is tell the OS that the storage space those files occupy is available for storing new data. What’s more, unidentified copies of sensitive files could be scattered in other places on your drive.
Reformatting the drive isn’t a sure-fire solution, either. Anyone with the least bit of skill will still be able to recover files in either scenario with minimal effort.

The solution is to use software that’s specifically designed for the purpose of wiping a hard drive clean. You’ll find a number of programs capable of doing this, but we like LSoft Technologies’ freemuim Active@KillDisk because it’s extremely thorough and is designed to meet government standards.
The developer does sell more comprehensive versions of the software featuring more robust capabilities and customization, but said programs will cause you an upwards of $50 depending on your respective system.
First, head over to the Active@KillDisk download page and choose which version of the software fits your computing needs.
Next, insert a blank CD in your burner and initiate the installation process, which will burn an ISO image to the disc. If your computer isn’t already set up to boot from its optical drive, you’ll need to tweak your computer’s BIOS. Restart your machine and click the hot key — typically the Delete key — to access the BIOS settings.
Tab over to the Boot menu and configure the BIOS so that the CD/DVD drive tops the list of boot devices. After you save this setting and exit the BIOS menu, your machine should boot from the CD/DVD drive and automatically launch Active@KillDisk.
Keep in mind the free version of the software only supports only a One Pass Zeros method, which means the software will write zeroes or random characters across the entire hard drive, thus destroying any data in the process. Doing so will make it nearly impossible for a casual user to access any old data on the drive.
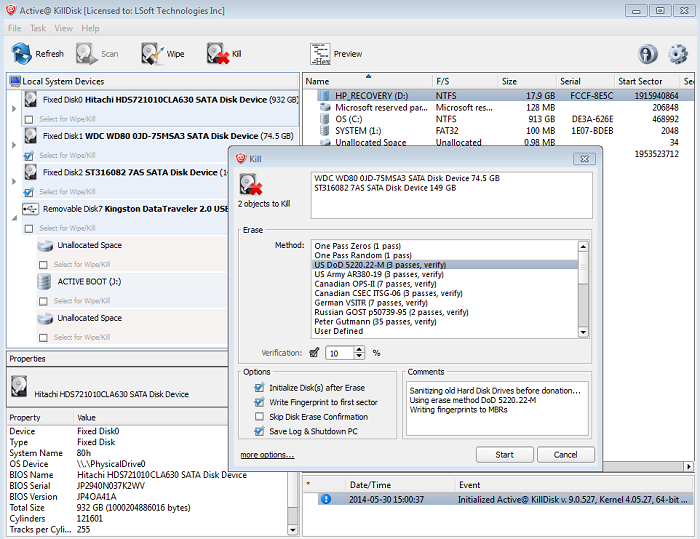
Once open, press the Enter key to acknowledge the message and Active@ KillDisk will display all the drives attached to your computer. Afterward, check the box directly beneath the drive(s) you wish to erase and press the F10 key, or click the Kill button in the toolbar to start the process.
Then, select your desired method from the resulting list — likely One Pass Zeros — and choose your desired parameters before clicking the Start button in the bottom-right corner of the window. Just to make sure you really intend to destroy the data on this drive, Active@ KillDisk will ask you to type the phrase “ERASE-ALL-DATA” into a box and hit the Enter key once more, or simply click the Yes button.
The program will then do its thing, conveniently displaying a progress bar below the disk you’re erasing in the left panel. When it’s finished, it will display a report showing what it did and how long it took. Repeat this process for any additional hard drives or partitions on your computer.
When you’re finished, press the Escape button to exit the program. You can now safely dispose of your PC with little worry that someone will be able to resurrect any of the information you had previously stored on it.
Read more: http://www.digitaltrends.com/computing/how-to-erase-and-encrpyt-a-hard-drive/#ixzz39vanpREe