-
Tag Line: Solving Boot and Startup Issues
Successor to the antiquated BIOS, the Unified Extensible Firmware Interface (UEFI) adds powerful security tools to post-XP systems.
Ironically, UEFI can also block important repair, recovery, and backup tools that boot from DVDs, CDs, or USB drives.
Windows 8′s tight integration with a PC’s UEFI can be especially problematic when you need to run bootable rescue media. This article will show how to fully master the UEFI boot system on Vista, Windows 7, and Windows 8 systems. At the end, you’ll have the benefits of UEFI security but also know how to bypass its drawbacks.
The many strengths — and weaknesses — of UEFI
From the start, all PCs have contained low-level, semipermanent software that wakes up a system’s components in the correct order and then hands off overall control to whatever operating system is installed.
In old systems, that software was the Basic Input/Output System, known to nearly all PC users as the BIOS. Commonly called “firmware,” the BIOS was specifically designed to be rarely, if ever, changed or updated. Its sole function was to initiate system startup.
As PCs became more powerful, the BIOS became effectively obsolete (more info). A more powerful and flexible replacement for the BIOS — UEFI — first appeared in PCs in 2005. It’s essentially ubiquitous in newer machines. In fact, it’s likely that the PC you’re using right now is UEFI-based.
Most early versions of UEFI, such as those found in Vista PCs, simply mimicked the limited capabilities of the classic BIOS. Then, a slightly more useful UEFI showed up in many machines sold with Win7. Users could, for example, access the UEFI settings while Windows was running; the UEFI could also access multi-terabyte hard drives and allow vendor-specific enhancements.
UEFI truly came into its own with Windows 8. The OS makes extensive use of UEFI capabilities, including security features such as rootkit protection that starts the moment the PC is turned on — long before the operating system or standard anti-malware tools load.
The cost of UEFI security: UEFI can cause major problems. For example, UEFI can make it very hard to boot an alternate OS such as Linux from CDs, DVDs, or flash drives. It can even prevent you from running self-booting system-recovery/-repair tools or anti-malware apps that run outside of Windows — often, the only effective way to root out malware hiding deep within Windows.
Of course, this UEFI drawback typically shows up at the worst possible moment: after a major system crash or other significant PC emergency. Just when you really need to boot from a rescue disc or flash drive, UEFI might throw up a roadblock, preventing access to the tools you need.
To show you how to take control of your PC’s UEFI system, this article is divided into three major parts: a description of the problematic UEFI components, testing your PC’s UEFI implementation, and how to manage the UEFI.
Let’s get started!
UEFI components that might cause boot trouble
There are five elements of UEFI that can defeat your attempts to launch self-booting media. Later in the story, you’ll see how to adjust these items. But first, the following general descriptions will help you understand what the five elements do.
Note: Though Windows 8 can implement all five elements, Vista and Windows 7 systems use subsets of these components. It’s also important to know that each hardware vendor might enable or disable a different set of UEFI features — or call them by different names. I’ve used the most common names below.
Also, when discussing a “Win8 system,” I mean a PC that was designed to run Windows 8. The OS will run on older PCs, but an older UEFI probably won’t have all five components Win8 supports. The same holds for Vista and Win7 machines.
- UEFI/CSM Boot: Virtually all Win8 — and many Vista and Win7PCs — can boot with either the generic UEFI system (UEFI Boot) or a compatibility-support module (CSM Boot). CSM Boot emulates old-style BIOS actions for operating systems that require it. In some cases, CSM Boot must be specifically enabled before a PC will boot from a “foreign” operating system or from a device other than the hard drive. What’s more, to use CSM Boot, both UEFI Boot and Secure Boot (see next item) must be disabled.
- Secure Boot is a Win8-specific, UEFI implementation that prevents unauthorized or unrecognized operating systems from loading. For example, some classic Linux-based repair/recovery discs lack the required security certifications; they won’t boot if a PC is in Secure Boot mode. If you disable Secure Boot, the system reverts to the generic UEFI Boot.
- Fast Boot is a UEFI option that often varies by vendor and Windows version. In older systems with simpler UEFI implementations, Fast Boot saves a few seconds at startup by skipping several routine hardware checks.
- With Windows 8, Fast Boot significantly speeds the startup process by overriding and skipping many optional settings. For example, it always boots directly from the primary hard drive — no matter what other boot-order settings you might have set manually.
-
Typically, Win8′s Fast Boot must be disabled if you want to boot from a standard optical drive, flash drive, network drive, etc. — essentially any source other than your primary hard drive. - Trusted Boot is a UEFI module that checks the integrity of the startup software before allowing it to load. Trusted Boot is disabled when you select CSM boot.
- Early Launch Anti-Malware (ELAM) is a Win8-specific UEFI implementation that’s active when Secure Boot is enabled. Launching early in the initial boot process, ELAM scans all subsequently loaded system-level drivers to ensure they’re not carrying hostile payloads such as rootkits.
UEFI/CSM Boot, Secure Boot, and Fast Boot usually can be managed separately by end users; Trusted Boot and ELAM typically cannot.
A fully accurate test for UEFI boot problems
You obviously don’t want to discover UEFI-related boot problems while attempting to recover from a major system failure. It’s far better to test your UEFI settings now — well before an emergency.
The test is safe and simple, and it takes only minutes. You simply create a bootable CD, DVD, or flash drive and then try to boot your system from it.
Though any type of bootable media will do, it’s best to test the UEFI with the combination of media and recovery tool you’ll use if your PC encounters trouble.
For example, all versions of Windows feature a built-in tool to create a bootable repair/recovery disk or flash drive. (Every Windows user should have at least this type of emergency tool on hand.) But there are also many third-party repair/recovery tools available.
The April 10 Top Story, “Emergency repair disks for Windows: Part 1″ lists nine different options for creating repair/recovery tools — most of them are free. (The title states “disks,” but the tools also can be used on flash drives.)
If you don’t already have a known-good emergency disk or drive available, take a few moments to check out the options listed in the above article. Next, create the bootable media of your choice.
XP, Vista, and Windows 7 users can test their emergency boot medium using techniques described in the April 17 Top Story, “Emergency repair disks for Windows: Part 2.” That article also describes how to work around the most common obstacles that can interfere with successfully booting from a repair/recovery tool.
If you can start your XP, Vista, or Win7 system correctly with the boot disk of your choice, great! You’re done!
If, on the other hand, you run into trouble, skip down to this article’s “Inside the UEFI management software” subsection for possible solutions.
Windows 8 users should continue to the next section below for instructions on testing their UEFI configuration — and to adjust its settings, if needed. (The Win8 information in the aforementioned “Emergency repair disks for Windows: Part 2″ is now out of date, due to changes in the operating system itself. Also, many third-party, emergency repair/rescue tools now work with Win8.)
Steps for testing Window 8′s UEFI configuration
![]()
Preparation and first steps: As with any major change to your PC, start by saving all your work, closing all running apps, and backing up the system.
- Simplify your PC’s boot hardware as much as possible. Disconnect all potentially bootable external devices — except the one from which you intend to actually boot. For example, if you’re going to boot from a DVD, unplug any unneeded USB drives or flash devices currently connected to your system.
- Open the Charms bar, click the gear icon (Settings), and then click Change PC settings at the bottom of the bar.
- On the PC settings page, select Update and recovery.
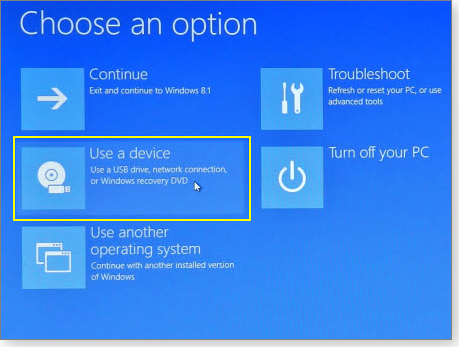
- Click Recovery and then, under Advanced startup, click Restart now. (Despite the terminology, your PC will not immediately restart — that’s normal.) The Choose an option page will open.
If your PC has UEFI-compatible hardware, you’ll see a Use a device option (see Figure 1).
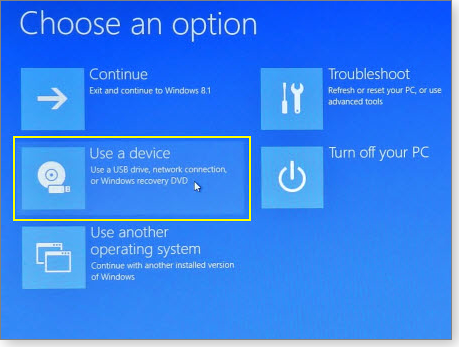
Figure1. If your Win8 PC has UEFI-compatible hardware, the Use a device option gives you easy access to alternate booting methods.
If your PC doesn’t show a Use a device option, don’t worry; just skip ahead to the section of this article labeled “The Advanced alternate booting option.”
![]()
The simple “Use a device” option: If it’s available to you, Win8′s Use a device options menu is the easiest way to try booting from alternate media or the network. It automatically makes temporary adjustments to the relevant UEFI settings (including Fast Boot and Boot Order) to allow booting from the device you select.
(Use a device won’t work if the hardware is incompatible with UEFI or the alternate OS is incompatible with Secure Boot.)
Unfortunately, there’s no way to know in advance whether all aspects of your system will work correctly with the Use a device setting — you simply have to try booting your PC with the selected device and see what happens. Here’s how:
Click on Use a device.
Click on the EFI (extensible firmware interface) device that you want to boot from: USB, DVD/CDROM, or network.
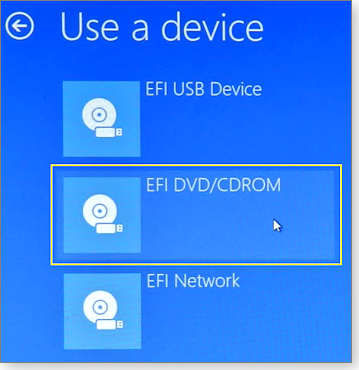
Figure 2. Select the UEFI-compatible boot device you wish to try — in this example, I've selected a DVD/CD drive.
- Click the Reboot button when it’s offered; your PC will shut down and then try to boot from whatever device you selected.
-
Follow the instructions for whatever prompt then appears. For example, if you’re booting from an optical drive, you should press a key when the Press any key to boot from DVD or CD ROM prompt appears.
Note: If you have trouble booting from a USB-based drive, use a USB 2.0 port (typically denoted by a white or gray connector) if possible. I’ve found USB 2.0 to be more reliable than USB 3.0 (blue connector) in boot operations.
If your system boots from your recovery media, you’re done! Your hardware, media, and software are all UEFI-boot compatible — as they are.
If the boot process fails, you’ll likely get a rather generic error message. For example, if I try to boot my system from a DVD containing a Linux distribution that’s not compatible with Secure Boot, I get the error message: “System doesn’t have any CD/DVD boot option.” It does have that option, of course — the drive was selected in Use a device — but that option is incompatible with Secure Boot.
No matter what error message you receive, if your PC fails to boot via the Use a device option, just bail; reboot normally back to Windows, work your way back to the Choose an option screen, and follow the steps below.
![]()
The Advanced alternate booting option: If Use a device isn’t available or fails, your next stop is the Advanced alternate booting option, available under the Troubleshooting menu.
On the Choose an option screen, click Troubleshoot and then Advanced options (Figures 3 and 4).
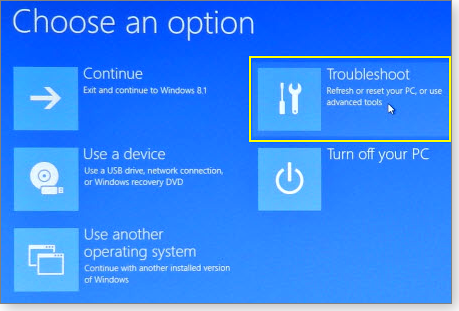
Figure 3. For more advanced boot options, first click Troubleshoot in the Choose an option menu.
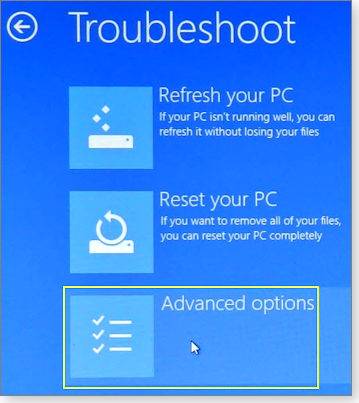
Figure 4. Next, click the Advanced options to access UEFI settings.
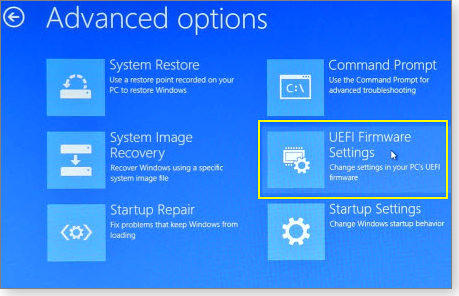
If a UEFI Firmware Settings option (Figure 5) appears, select it. Note: This option might also be under a somewhat different label, such as Change UEFI Settings.
If no such option exists, skip down to the section below labeled “If there’s trouble — or no UEFI menu at all.”
![]()
Figure 5. If the Advanced options menu includes UEFI Firmware Settings (or something similar), click it.
On the UEFI Firmware Settings screen, select Restart (Figure 6). Your PC will restart and automatically run its built-in UEFI management software.

Figure 6. Click Restart to enter your PC's UEFI management software.
Working inside the UEFI management software
UEFI setting pages often look much like classic BIOS screens — and typically work in much the same way. Follow the on-screen directions for navigating to the settings you’re going to change. Next, make the following changes.
On Windows 8 systems, start by disabling Secure Boot. The setting is typically found under Security (see Figure 7), Boot, Authentication, or some similar heading.
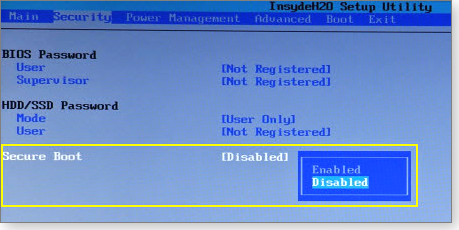
Figure 7. In Windows 8 only, disable Secure Boot.
Next, on Vista, Win7, and Win8 systems that offer it, disable Fast Boot (Figure 8), commonly found under a Boot Speed option. On my system, Boot Speed is under the Advanced heading.
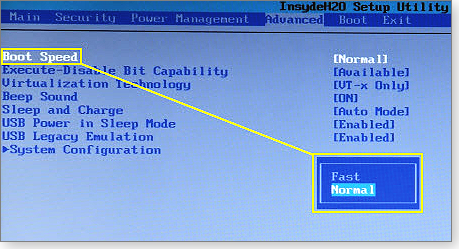
Figure 8. To disable Fast Boot, select Normal, Standard, or Slow Boot — or whatever your vendor calls it.
On Win8 and most Win7 and Vista PCs, set the Boot Mode to CSM (Compatibility Support Module). Again, CSM makes your PC behave as if it had the old-school BIOS required by some software.
On my system, this requires three clicks: one to access the Advanced/System Configuration menu (Figure 9), a second to access the Boot Mode settings, and a third to change to CSM Boot (Figure 10).
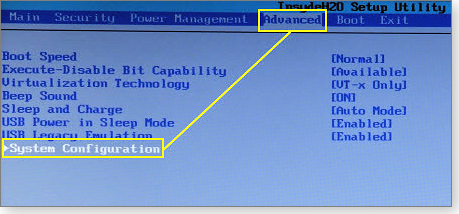
Figure 9. On some systems, the Boot Mode setting is under Advanced/System Configuration.
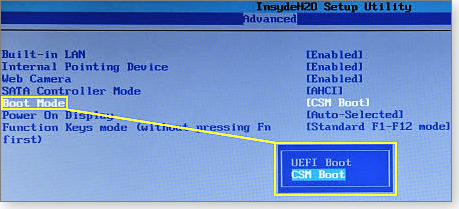
Figure 10. Set the Boot Mode to CSM for full software compatibility.
Your PC’s labeling might differ from mine, but the idea is the same: deselect UEFI boot and switch to a traditional BIOS-style CSM boot option.
Now set the boot order; you want your PC to first try the device you selected, upon restart. UEFI boot-order settings are usually under the Boot section (or something similar).
For example, if you want to boot from a DVD/CD drive, change the PC’s boot order so that the optical drive is at the top of the list. Your options will likely look somewhat similar to those shown in Figure 11.

Figure 11. Move the device you want to boot from to the top of the boot order list. (Shown: ODD, or Optical Disk Drive, is now first.)
When you’re done, save your settings and exit (typically by pressing the F10 key).
Your system will now restart, using a traditional BIOS-type (CSM) boot process. It’ll bypass Secure Boot, skip the Fast Boot shortcuts, and attempt to use whatever device you selected as the first boot device.
If there’s trouble — or no UEFI menu at all
If you know your system has a UEFI, but you can’t find or access its settings, almost all systems offer the alternate, old-school trick of pressing a specific function key during initial boot or using special OEM software. However, whenever possible, it’s best — and safest — to use the menu-access methods described above. It will ensure that Windows and the UEFI system remain in sync.
If you’ve tried everything in this article and still can’t properly control UEFI booting, visit your PC vendor’s online support site and search for instructions specific to your brand and model of PC.
Wrapping up, plus sources of more information
When you’ve successfully booted your system from your emergency repair/recovery tool, make note of any unusual steps you had to take. Store that information with your emergency boot media (DVD/CD, flash drive, whatever), and put both in a safe place. A bit of preparation now could prevent a lot of headaches later — if or when it all hits the fan!
As a last step, undo the changes you made to your UEFI settings, restoring them to their original configuration.
That’s it! You’re done. You can now have the comfort of UEFI’s benefits for routine operation, plus the confidence that you can bypass the UEFI when needed.

Join the conversation
You can post now and register later. If you have an account, sign in now to post with your account.