Jump to content

Resources

Free PC Help Forum resources, guides and tutrials.
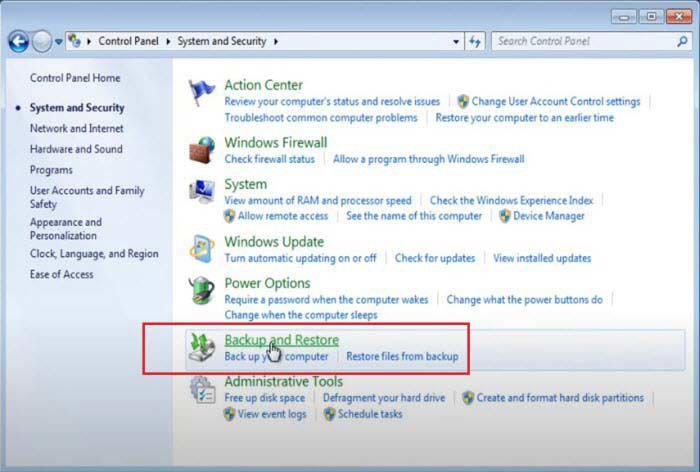
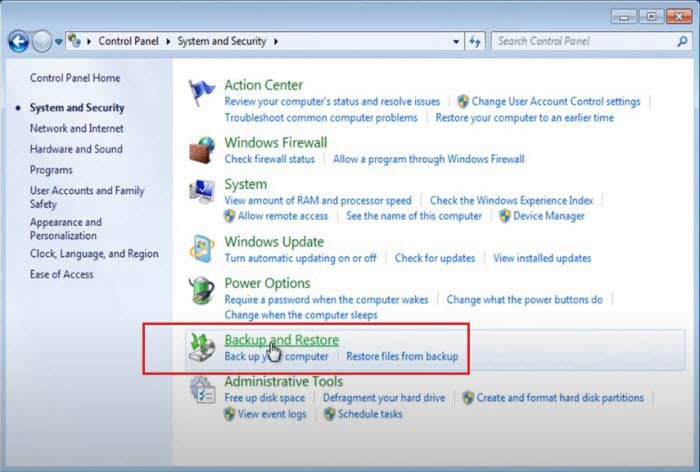
Open Backup and Restore by clicking the Start button clicking Control Panel , clicking System and Maintenance ,
and then clicking Backup and Restore. Click Set up back up, and then follow the steps in the wizard.   If you're
prompted for an administrator password or confirmation, type the password or provide confirmation.
Backup and Restore helps you transfer personal files, e-mail, data, media , and settings from your old computer
to the new one.
User accounts
Files and folders
Program data files and settings
E-mail messages, settings, and contacts
Photos, music, and videos
Windows settings
Internet settings
If you own a removable hard disk, Backup and Restore can copy your data to that disk and then copy data from that
disk to your new computer.
Removable hard disk or External Hard Drive
CD and DVD Backup and Restore can use a computer's CD or DVD burner to transfer user data.
Restore files from a backup
You can restore backed-up versions of files that are lost, damaged, or changed accidentally. You also restore individual files,
groups of files, or all of the files that you've backed up.
Open Backup and Restore by clicking the Start button , clicking Control Panel , clicking System and Maintenance , and then
clicking Backup and Restore . To restore your files, click Restore my files .
To restore the files of all users, click Restore all users' files .  If you're prompted for an administrator password or
confirmation, type the password or provide confirmation.
To browse the contents of the backup, click Browse for files or Browse for folders . When you're browsing for folders, you
won't be able to see the individual files in a folder. To view individual files, use the Browse for files option.To search the
contents of the backup, click Search, type all or part of a file name, and then click Search.
To Restore a Backup Made on Another Computer
You can restore files from a backup that was created on another computer running Windows Vista or Windows 7 .
 
Open Backup and Restore by clicking the Start button , clicking Control Panel , clicking System and Maintenance ,
and then clicking Backup and Restore.
 
Click Select another backup to restore files from, and then follow the steps in the wizard .
If you're prompted for an administrator password or confirmation, type the password or provide confirmation.
allheart55 Cindy E
How To Access The Manufacturer Recovery Partition
Most Laptops come with a recovery partition (sometimes called a restore partition or factory reset tool). If your installation
of Windows should stop working or become corrupted, you can use this partition to restore your laptop to the same state that it
was when you first bought the computer.
Please note: this will remove any information/documents/files that are on the hard drive - so it is usually used as a last resort.
Each manufacturer has a different method of accessing the recovery partition, so you may need to read the manual to find out if your
model comes with this feature and how to access it. I have listed some of the common brands below:
Acer eRecovery: Plug in the AC adapter and battery, then turn the system on
Immediately, press ALT on the keyboard and start tapping F10. Continue holding ALT and tapping F10 as the unit boots up.
A screen stating Starting Acer Erecovery should appear. (Release ALT and stop tapping F10 at this point)
There will be 4 options:
Restore system to factory default
Restore system from user backup
Restore system from cd/dvd
Exit
Asus System Recovery: Turn on the notebook, Press F9 when you see the ASUS logo, and then choose the second item to recover OS to the first partition.
Press [F9] during bootup (requires a Recovery Partition)
Press [Enter] to select Windows Setup [EMS Enabled]
Read the “ASUS Preload Wizard” screen and click Next.
Select a partition option and click Next.
Follow the on-screen instructions to complete the recovery process.
Dell Restore Partition: Turn on the computer.
When the Dell splash screen appears during the computer startup process, press and hold and then press .
Release both keys at the same time.
Gateway Recovery Partition: Turn on your computer, then press Alt+F10 during startup. Gateway Recovery Management opens.
Click on Restore system from factory default.
Click on Next. Your hard drive’s original, factory-loaded contents are recovered. This process will take several minutes.
HP / Compaq System Recovery: Turn on the computer and repeatedly press F10 at the HP logo until the recovery screen appears.
When the recovery screen appears, press "Next" and then "Yes" to perform a non-destructive recovery. To perform a destructive recovery, click Advanced and then Yes.
After the recovery is finished, the computer will reboot.
Sony Recovery Partition: Turn off your computer.
Restart your computer.
When the VAIO logo appears on the computer's screen, briefly press the F10 key on the computer keyboard.
The VAIO Recovery Wizard appears.
Click Next.
Select one of the available menu options.
Toshiba Recovery: Make sure the computer is turned off.
Press and hold the 0 (zero) key on your keyboard while powering on the computer. When the computer powers on, the TOSHIBA HDD Recovery Utility screen displays
allheart55 Cindy E
Swipe right on the desktop to bring up the Search Bar. Type System Restore into the Search Bar and hit the Enter Key.
In the System Properties Window, select System Restore.
  
 
In the System Restore Window, click Next.


You can select one of the Restore points shown or you can place a check mark in the box next to Show more restore points and click Next.
  
 
Choose Scan for affected programs if you wish to see if anything new will be affected by the Restore. Click Next.
Confirm the System Restore Point and select Finish.
  
 
System Restore will begin. It may take some time so be patient and allow it to finish.
Your computer will reboot when Restore has completed.
allheart55 Cindy E
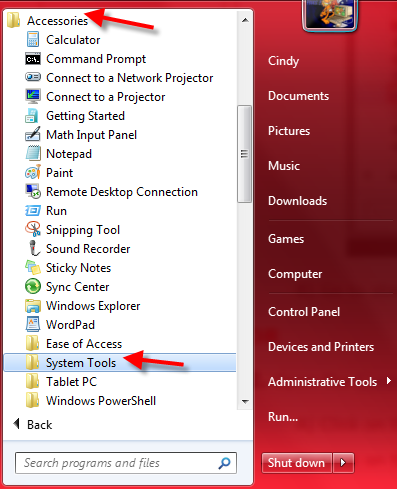
Open the Start Menu.
Click on All Programs, Accessories, System Tools, and System Restore.

A new window opens, Starting System Restore.

Click on the Next button.

Select a restore point and click Next
OR
Select a listed restore point that you want to restore Windows 7 back to.
NOTE:
Check the Show other restore points box to see any restore points that may not be listed here

Choose a different restore point, and click on the Next button.

To Show Affected Programs and Drivers
NOTE: This will show you a list of programs and drivers that will be deleted and restored by the selected restore point.
Click on the Show affected programs and drivers button.
When done reviewing, click on the Close button.

Click on the Next button.
NOTE: Make sure that the restore point you want is still (highlighted) selected.
Click on the Finish button.

Click on Yes to confirm.
WARNING: This will immediately restart your computer to finish the system restore.

After the computer has restarted a new window should say, System Restore has completed successfully.
The system has been restored to.......
Click the Close button.
allheart55 Cindy E
How to Reset or Restore Advanced Settings in Internet Explorer.
Click Tools and then click on Internet Options

Click on the Advanced Tab

Choose Restore Advanced Settings or Reset .

Click Apply and OK . Reboot computer.
Warning : Reset will delete all temporary files, disable all browser add-ons and reset all changed settings.
allheart55 Cindy E
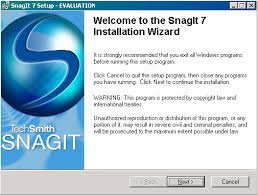
Download SnagIt version 7.2.5 here. http://www.oldversion.com/windows/snagit-7-12
This version of Snagit is the last free version and it isn't a trial version. You have to install it in the following manner.
First window, Uncheck the box Sign me up....
 
 
Second Window, Click the Unlock Link

Third Window, enter your name and the unlock code.
(YW6RC-4YMK6-SZBBD-C2MCW-Q9D96) Click OK.

Fourth Window, Uncheck Copy my software key....Click Close.

Fifth Window, Uncheck Prompt before update.Click No.

Do not ever check for any updates. If you check for updates, you will lose the free version.
It will update to the latest version and that isn't free.
allheart55 Cindy E