Jump to content

Resources

Free PC Help Forum resources, guides and tutrials.
The upgrade to Windows 10 has been smooth for most, but some users will always encounter issues. Whether it’s the screen flashing, not being able to connect to the Internet, or the battery draining too quickly, it’s time to resolve these problems.
We’ve rounded up the most common and annoying issues that users encounter in Windows 10, along with easy steps to fix them. Don’t downgrade from Windows 10 just yet, your woes could be solved.
If you’ve had your own annoying Windows 10 issue that you were able to resolve, please do let us know it in the comments section below.
1. Update Stuck Downloading or Won’t Install
Since Windows 10 forces updates on you, it makes it even more frustrating when the Windows Update process doesn’t go smoothly. If one of your updates is stuck during download or is refusing to install, it’s likely that the file is corrupted. In that case, it’s necessary to flush out the update files and start from the top.

To do so, press Windows Key + R to open Run and input C:\Windows\SoftwareDistribution\Download and click OK. Next, delete everything inside the folder, but don’t delete the folder itself. You might need to boot into safe mode if some files won’t delete. Once complete, restart your computer and attempt the update process again.
If this doesn’t work, check out our guide to resolving Windows Update problems, where you can find other tips that might help.
2. Battery Draining Too Quickly
Those of you on portable devices that upgraded to Windows 10 at launch may have found that the new operating system took a hefty toll on your battery life. Intel and Microsoft solved this together, so make sure your drivers are up-to-date and you should find it resolved.
If not, you might want to turn attention to some of Windows 10’s new features. Though Cortana, the virtual assistant, can come in very handy, she does impact the battery slightly. If you want to reserve all the power you can, do a system search for Cortana, select the relevant result, then switch Let Cortana respond to Hey Cortana to Off.

Windows Update can also have a drain on your battery (and bandwidth), especially now that it can share updates you’ve downloaded with others. To turn this off, press Windows Key + I and then navigate to Update & security > Windows Update > Advanced options > Choose how updates are delivered and move the switch to Off.
For even more battery saving advice, along with details on how to make use of the handy Battery Saver feature, be sure to read our guide on optimizing battery life in Windows 10.
3. Default App Choices Have Changed
Did you upgrade to Windows 10 and find that your images weren’t opening in your favorite app anymore? Or that your browser had defaulted to Microsoft Edge? For whatever reason, Windows 10 isn’t good at remembering what programs you’d chosen to open specific file types. Though it’s a pain to reconfigure them all, it’s easy to change your default apps.

 
First, press Windows Key + I and select System. Then, from the left-hand navigation, choose Default apps. Here, you can change your default app for your photos, videos, and more.
If you want more refinement than this settings page offers, like being able to change the program for each file type or protocol, be sure to read our guide on how to quickly fix file type associations.
4. Wi-Fi Connection Not Discoverable
If your system is no longer detecting your Wi-Fi connection, this is likely due to VPN software that you have installed. It can also impact some Ethernet connections. Your first port of call would be to go to your VPN software’s website and update to the latest version, one compatible with Windows 10, as this might solve the issue.

If this doesn’t work, open an administrative Command Prompt by pressing Windows Key + X and selecting Command Prompt (Admin). Then input the following two lines, pressing Enter after each:
reg delete HKCR\CLSID\{988248f3-a1ad-49bf-9170-676cbbc36ba3} /f netcfg -v -u dni_dne
If this doesn’t work, the issue might be driver related, rather than VPN. For this, system search device manager and select the relevant result. In the new window, expand Network adapters. Then right-click your wireless adapter and select Update Driver Software….
Still without a connection? See our further tips in our guide to fixing your wireless Internet connection.
5. Touchpad Not Working
If your touchpad isn’t working, let’s start with some simple steps to see if it’s actually enabled. First, check your keyboard to see if there’s a function button that turns the touchpad off and on. This will vary depending on your device, but it’ll usually be represented by an icon on one of the F# keys.
If this doesn’t work, press Windows Key + I, select Devices > Mouse & touchpad > Additional mouse options. A new window will open and from here you need to click the tab which is furthest to the right, likely called Device Settings. Underneath Devices, select your touchpad and ensure it’s not disabled. If it is, then click the Enable button.

Failing this, press Windows Key + X and select Device Manager. Then expand Mice and other pointing devices, right-click your touchpad and select Update Driver Software…. You could also navigate to the manufacturer’s website and download your drivers that way instead.
Now that your touchpad is hopefully working again, learn how to get the most from your touchpad in Windows 10, courtesy of our comprehensive guide.
6. Can’t Install or Update Store Apps
If you’re having trouble installing or updating apps within the Store, you might need to clear the cache. This is really easy to do.

First, press Windows Key + R to open Run. Input WSReset.exe and click OK. A blank Command Prompt window will open, but don’t worry, it is working away. Eventually it’ll close and the Store will open, hopefully with your issues resolved.
7. Microsoft Office Files Don’t Open
If you’re trying to open Microsoft Office files and getting errors like “file is corrupt and cannot be opened”, “unable to start correctly”, and “experience an error trying to open the file”, it might be due to problems with the Protected View feature.

To overcome this, press CTRL + X and then select Command Prompt (Admin). Input the following command, but replace the Office number with whatever version you’re using, and then hit ENTER on your keyboard: icacls "%programfiles%\Microsoft Office 15" /grant *S-1-15-2-1:(OI)(CI)RX
You should now be able to open your Office files. If not, try repairing the installation. For this, do a system search for programs and features and select the relevant result. Find Office in the list, right-click it and then press Change. Select Online Repair and then click Repair.
8. Flickering or Flashing Screen
If your screen is flickering or flashing when it didn’t before, it’s likely due to an incompatible application or driver. Norton AntiVirus, iCloud, and IDT Audio are all programs that are known to cause this problem. Update them and see if it fixes the problem, else you might need to uninstall then reinstall. On Norton’s part, they have an official support page to help.
Alternatively, you might need to remove your display driver and reinstall, or rollback to a previous version. Windows 10 automatically updates your drivers and it might be that it’s forcing an incompatible version on you. For detailed steps on how to do this, along with other advice, read our guide on how to fix Windows 10’s flashing screen problem.
How Do You Solve a Windows 10 Problem?
An operating system will never be completely problem-free, but hopefully we’ve been able to resolve some of the most annoying issues that have been cropping up in Windows 10.
Your first exercise should always be to update the associated drivers or the program itself, just in case Windows Update hasn’t handled this for you automatically. It might be that you’re running an older version that isn’t compatible with Windows 10.
allheart55 Cindy E
Safe Mode is the famous (or perhaps infamous) method of opening up a limited version of Windows to get around bugs or avoid viruses while troubleshooting problems and finding solutions. Traditionally, you could boot into Safe Mode in Windows by starting up and pressing F8 when the operating system first loads. However, Microsoft‘s latest iteration of Windows doesn’t follow this rule, so let’s go over how to boot into Safe mode in Windows 10.
Which safe mode do you want?
On Windows 10 there are a few different types of Safe Mode you can choose from, so it’s important to know what they do and which you need.
Safe Mode: This is the basic version that strips away all unnecessary programs and only autostarts a few chosen files and drivers to get the basic system running. It doesn’t allow for many advanced features, including connections with other computers or devices. That makes the computer safer from malware that may be able to move through local networks (like the WannaCry ransomware appeared capable of doing). Safe Mode with Networking: This is a mode that adds on the necessary drivers and features to access networks. It’s not quite as safe, but it’s useful if you only have one computer and need to get online to look for help or see if connections to other devices still work. Safe Mode with Command Prompt: This option may not be available on all versions of Windows 10, but if it is you can enter this mode to bring up a big command prompt screen. This is good for more badly damaged operating systems or technical work where you know the precise command lines necessary to find a problem or launch a specific service. Make sure you know how to use the Command Prompt before accessing this mode. Method 1: From the login screen or when frozen
If you are still on the login screen, this is an effective way to quickly boot into Safe Mode — and it may also work if Windows has suddenly frozen or programs like Outlook have become unresponsive.

Step 1: From the login screen, hold down “Shift,” and then click the power button on the screen (not your physical power button on the PC or laptop). A small box should pop up with a few different shut down options. Choose the “Restart” option.
Step 2: Windows should revert to a window that says “Choose an option” (it may take a little time so don’t try anything until you see this). From here you will need to go through a few different menus to find the right restart option. First choose “Troubleshoot,” then “Advanced options,” then “Startup Settings,” and then “Restart.”
 
Step 3: Windows should now open up to a new window that says “Startup Settings” and includes a list of different options. The first “Safe Mode” options should be “4,” with the other Safe Mode options following after. Press the number key for the Safe Mode that you want.
Method 2: When you’re already in Windows 10
There’s a slightly more roundabout way of booting into Safe Mode from Windows 10. You’ll find this method helpful if you want to shut down safely and restart Windows while preserving as much data as possible — without needing complex command lines.
Image used with permission by copyright holder Step 1: Head to your Start menu, and then choose or search for Settings.
Step 2: In Settings, look for Update & Security and select it. This will open a new window with a sidebar on the left side. In this sidebar, look for Recovery, and select that.
Step 3: Under the Advanced startup option, you should see a Restart now button. Select it and this will take you to the same selection screen as the first method of entering Safe Mode.
Step 4: Move through these menus by selecting Troubleshoot, then Advanced options, then Startup Settings, and then Restart.
Step 5: Give Windows time to load your selection of Startup settings. The Safe Mode options start at number 4. Press the number key for the Safe Mode you want.
Starting from a blank screen
Image used with permission by copyright holder Sometimes your PC will shut down before you can even reach a login screen, or it will refuse to show anything but a blank screen. If you can only get a blank or black screen, your steps to enter Safe Mode are a bit different. Here’s what you should try:
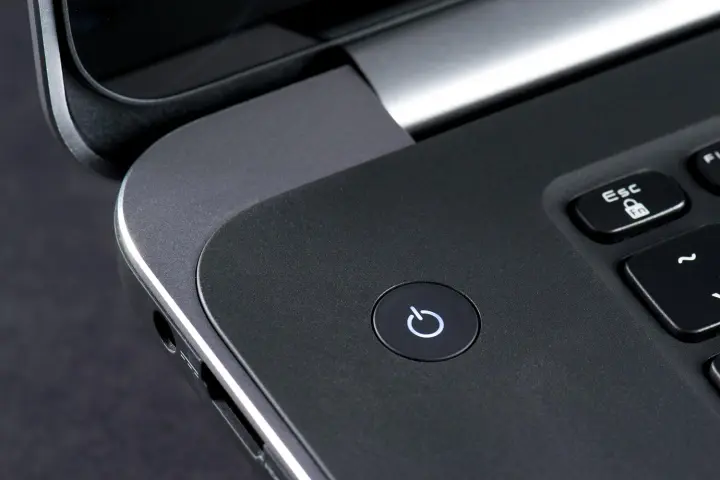
Step 1: Press the power button once to turn on your computer. Now, as soon as your computer gives any sign that it’s on — preferably a manufacturer logo on the screen, but if not, go with spinning fans — hold the power button down again for 10 seconds. You’re giving Windows 10 an SOS signal with these steps.
Step 2: Repeat Step 1.
Step 3: For the third time, press the power button once to turn the PC on, and at the first sign Windows has started, hold the power button down once more for 10 seconds until your device has turned off.
Step 4: Now press the power button a final time. Windows should have received the signal, and will boot up in recovery mode. From here, as before, select Troubleshoot > Advanced Options > Startup Settings > Restart. Then press the 4 key or a similar option for your desired Safe Mode.
Exiting Safe Mode
Once you fix your Windows problem, restoring the device’s original settings will require a few more steps. Follow the ones below to get back to your standard Windows 10 experience.
Note: You can also boot into Safe Mode from Windows by reversing the second part of Step 2.
Step 1: Start by clicking on the Start button. In the search box on your screen, enter MSConfig and click Enter. The computer will then go to the System Configuration feature automatically.
Step 2: Go to the Boot option. Under Boot options and on the lower left of the screen, you should see several options for Safe boot. Select one of those. Ensure that Safe boot is not checked.
Step 3: Now that Safe boot is unselected, choose OK, and opt to restart Windows 10. You can restart the computer as you normally would. From there, it should reopen with its full Windows capabilities.


allheart55 Cindy E
Windows Server customers often share with us the challenges of navigating rapid changes in recent years. Many of their IT estates have expanded to support growth, while teams are often changing, with talent coming and going. You may find your organization in a similar situation, with a sprawled IT estate that includes a mix of legacy and new applications and hardware. This can leave room for potential security vulnerabilities and compliance gaps, but also opportunities to optimize.
We are committed to supporting you through the next stages of optimization and growth in your organization, which starts with a secure IT foundation. Here are four best practices to keep your Windows Server estate secure and up-to-date:
1. Watch for update notifications and have a strategy to apply the latest security patches
A critical but often overlooked best practice is having a strategy to apply the latest security patches that are released. Our team continuously monitors and listens to customer feedback on any issues they have encountered and creates patches to address these. These are released on the second Tuesday of every month (known as Patch Tuesday). Keeping your various systems up-to-date with the latest patches will secure workloads and optimize day-to-day performance and operations. Learn more about best practices for software updates.
However, we know that patching also usually means rebooting and ultimately downtime for your workloads. If you are in Microsoft Azure, you can take advantage of Hotpatch, which allows you to keep your Windows Server virtual machines on Azure up-to-date without rebooting, enabling higher availability with faster and more secure delivery of updates.
2. Get deeper visibility and management capabilities at no additional cost
Many Windows Server customers might be familiar with many of the native Windows Server Microsoft Management Consoles (MMC). Windows Admin Center is the modern evolution of “in-box” management tools such as Server Manager and MMC. It has become the solution for managing Windows Server infrastructure, giving you deep management, troubleshooting, configuration, and maintenance capabilities over your server clusters.
It can be locally deployed with no cloud dependency or can be used within the Azure portal through direct integration, enabling you to carry over the simple and familiar UI when you decide to start adopting the cloud. Learn more in the Windows Admin Center documentation or download it today for free.
3. Check for end of support versions and prepare to modernize
Most organizations are likely to have a mix of Windows Server versions that support a variety of applications. Each version of Windows Server is backed by 10 years of support (5 years for mainstream support and 5 years for extended support) that include regular security updates, per the Microsoft lifecycle policy. After the end of support date, a version and its workloads will be vulnerable as they will no longer receive regular security updates. Windows Server 2012/R2 is the upcoming version that will reach the end of support on October 10, 2023.
With this in mind, a critical step towards optimizing performance and tightening security should be to check for Windows Server 2012/R2 versions, which will reach end of support soon. This can be done with various, built-in tools such as Server Manager, PowerShell, or at-scale with tools from Azure such as Azure Migrate or Azure Arc. Additionally, mapping out application and hardware dependencies on Windows Server should be done to determine the next best step:
Upgrading to the latest version such as Windows Server 2022 will provide the latest security, performance, and application modernization innovation. Learn more about how to perform in-place upgrades. If you are unable to upgrade by the end-of-support date, you can continue to stay secure on current versions by getting extended security updates1 for up to three years free in Azure or purchasing them for deployment on-premises. 4. Utilize cloud-native services for enhanced security and compliance anywhere
Whether your organization has migrated to Azure or is just starting to consider the cloud, here are some steps you can take now, to enhance your security with Microsoft:
Already in Azure: To maximize your security coverage in Azure, be sure to check your secure score and improve it by enabling services such as Microsoft Defender for Cloud, Microsoft Sentinel (cloud-native SIEM), and Azure Network Security. Have workloads on-premises: Extend Microsoft Defender for Servers to your on-premises Windows Servers by connecting them to Azure Arc. Ready to migrate to Azure: When you are ready to migrate workloads to Azure, your first step can be an assessment with Azure Migrate or getting expert help and support through the Azure Migration and Modernization Program. Learn more
We hope these best practices serve as starting points to help you increase security and optimize the performance of your IT platform, so you can focus on supporting business growth. Be sure to explore the resources below for further information:
Learn more about capabilities and offers for Windows Server on Azure. Watch our recent webinar on-demand titled “Optimizing Windows and SQL Server Security in Azure.” Register for our upcoming webinar titled “Cloud Migration Stories: Windows and SQL Server with Azure” on March 29, 2023, at 10 AM Pacific Time. Take the recently available Windows Server Hybrid Administrator Certification to apply your current Windows Server knowledge and learn how to apply it in the current state of hybrid cloud computing. Learn more about your options for Windows Server 2012/R2 end of support. Join the Windows Server Tech Community for regular Ask Me Anything (AMA) sessions.  
PCHF Staff
Windows 11 was released for the general public starting October 5, 2021. The rollout through Windows update has started to the eligible devices and continue until 2022.
Windows 11: A new era for the PC begins today | Windows Experience Blog Introducing Windows 11 | Windows Experience Blog What’s coming in Windows 11 Accessibility | Windows Experience Blog DOWNLOAD PC HEALTH CHECK APP (aka.ms) Windows 11 available on October 5 | Windows Experience Blog Download Windows 11 (microsoft.com) Windows 11 known issues and notifications | Microsoft Docs Resources for Windows 11 on Microsoft Community:
The following Forum Articles from our Article Authors at Microsoft Community would help to get started with Windows 11, including upgrading manually and a deeper dive at the new features incoming with Windows 11:
List of Changed or removed features/functionalities in Windows 11 Frequently Asked Questions: Windows 11 - Microsoft Community Windows 11 Keyboard Shortcuts - Microsoft Community How to Upgrade from Windows 10 to Windows 11 Upgrade from Windows 10 to Windows 11 using ISO file Troubleshoot Windows 11 upgrade and Installation errors How to Reset Windows 11 How to make clean install of Windows 11 Convert an existing Windows 10 Installation from Legacy BIOS to UEFI (microsoft.com) How to: Complete the Windows 11 Out of Box Experience Downgrade from Windows 11 to Windows 10 Forum articles on Features in Windows 11:
The Forum Articles on Features in Windows 11 are as under:
How to login automatically to Windows 11 How to: Use Snap Layouts and Snap groups in Windows 11 Widgets in Windows 11 How to Perform a Backup Using File History in Windows 11 or Windows 10 How to create a Local account in Windows 11 Get Started with Chat for Microsoft Teams in Windows 11 - Preview How to try out the new Office 365 Experience on Windows 11 How to Create a System Image in Windows 11 - 2021 Edition How to Connect or Pair Wireless and Bluetooth Devices in Windows 11 Add Clock to the second Display in Windows 11 - Microsoft Community Support Documents from Microsoft Support:
Ways to install Windows 11 Installing Windows 11 on devices that don't meet minimum system requirements Pin apps and folders to the desktop or taskbar (microsoft.com) How to use the taskbar in Windows 11 (microsoft.com) Customize the taskbar notification area (microsoft.com) How to open notification center and quick settings (microsoft.com) You can always start a new post for any questions or assistance regarding Windows 11.
 

AWS
In SQL Server environments, including on-premises, Azure SQL Database, or SQL Managed Instance, unexpected failovers can sometimes leave Availability Group roles out of sync. When this happens, the new primary replica might take over while the original primary faces issues, leading to possible data discrepancies if transactions were in progress or uncommitted. To recover or validate any data loss, it’s essential to resync or validate the new primary with the old primary as soon as it’s back online. This ensures any lost transactions are reconciled. If critical data was missed during the failover, it must be recovered and merged to maintain database consistency. This blog outlines the steps to recover or validate any data loss using SQL Server Database Compare Utility.
 
To simulate this situation with the SQL Server Box product, two SQL Server VMs were set up on the same subnet, Always-On HA was turned on for both instances, a simplified WideWorldImportersDW (WWIDW) database was restored and set to full recovery mode. After creating the certificates and logins/users required for Availability Groups (AGs) without domains, an asynchronous commit AG was created (it needed to be asynchronous, since we cannot simulate transaction loss with a synchronous AG).


Using a transaction simulator, many transactions per second were performed into the primary database.


During this activity, the primary instance was stopped, which created a group of committed transactions that had not been replicated to the secondary. The goal of this post is to recover those missing transactions.
 
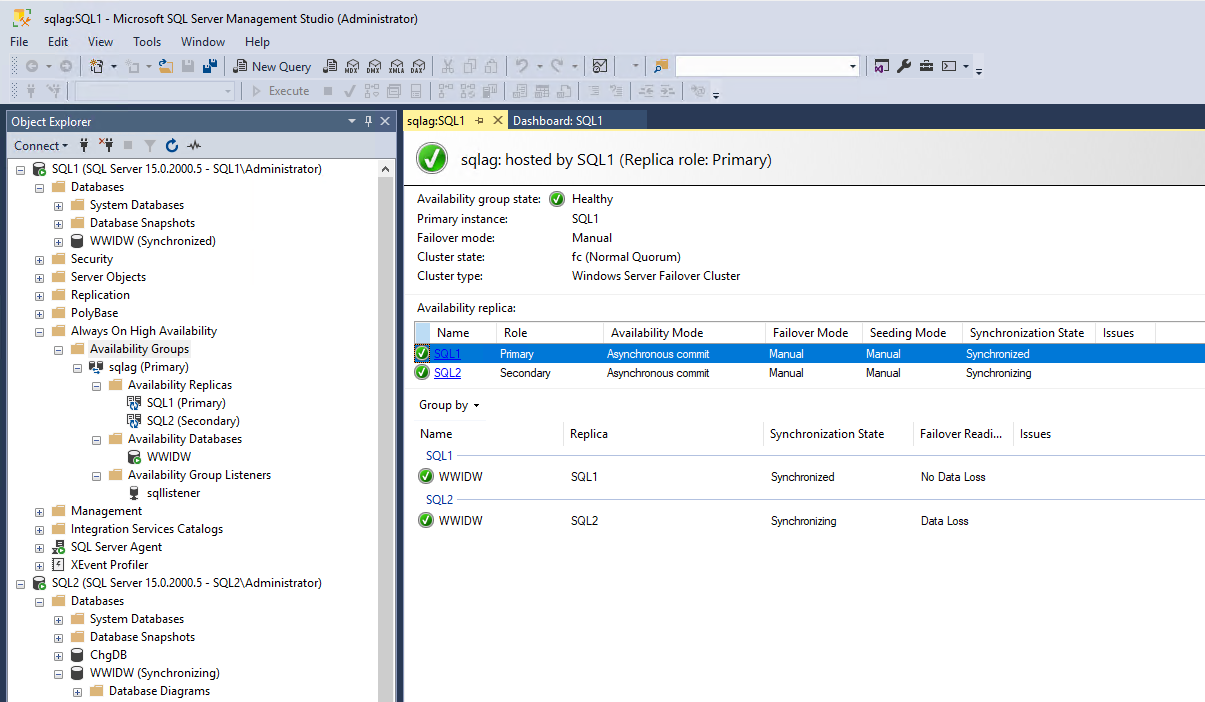
After stopping sql1, you need to open the dashboard on sql2, because SSMS can no longer connect to sql1 to update the status:


Opening the Failover wizard – you see a warning about data loss:


The wizard really wants to make sure you know there may be data loss:


Click through to get the results:


The dashboard for sql2 has the current cluster status:


To capture the state of the new primary, immediately create a database snapshot, ideally before opening it up to new application connections:


(In this case we were using sql1 in the transaction simulator and not the sqlistener, so no transactions will be written to sql2).
 
Restart the sql1 instance. On refresh, you will see that the old primary now has a state of Not Synchronizing / In Recovery.


Create a database snapshot on the old primary (sql1) before making the old primary the secondary (otherwise, when the old primary synchronizes as a secondary, the missing transactions are lost😞


At this point you can Resume Data Movement to make the old primary a secondary.


It takes a minute for the old primary to roll back lost transactions and resynchronize with the new primary and the old primary should now be a synchronizing secondary;


We can now use the SQL Server Database Compare (SSDBC) application to check if we lost any transactions between the snapshot on the new primary (sql2 – the source) and the snapshot on the old primary (sql1 – the target). Refer to the SSDBC documentation for how to set it up.


In this case we have 313 hash differences (updates) and 423 missing (inserts) rows – note that we have no deletes that were not replicated because of timing of the simulated transaction cascading deletes (deletes stop if we exceed the configured percentage until the inserts/updates catch up):

 
Looking at the SSDBC folder in My Documents – we can see a SQL script file for each table in the database, with numbers in front to indicate the order you should run them in (based on foreign key references). If the database has DRI configured, you may need to combine scripts if the referenced table has an identity column and if you have the identity value capture option turned on. In the same folder are log files which contain more details about the comparison.


Opening one of the files, you can see update and insert statements. The update statements are written to try to be as safe as possible by checking (with additional conditions in the where clause) that the column value hasn’t been subsequently changed on the new primary.


After running all the change scripts on WWIDW on sql2 and then re-running SSDBC on WWIDW on sql2 (not the snapshot) and the sql1 snapshot – we see that the databases are now the same (note that this will only work on a static new primary);


Note that we could also use the tablediff utility or SSDT to generate a differences script.
 
The SSDBC download package contains a PowerShell script to make running the comparison operations across many servers/databases easier by making it Excel workbook driven. You can list your source and target servers and databases in the provided Servers.xlsx workbook and run the BulkDatabaseRecovery.ps1 script.
AWS
You can do many things with docker. Install software that doesn't natively run on Windows for one. I use it to test Discourse a popular forum software. 
To install Docker on Windows, follow these steps:
Prerequisites
Windows 10 64-bit: Pro, Enterprise, or Education (Build 15063 or later) or Windows 11. WSL 2: Windows Subsystem for Linux version 2 must be enabled. Installation Steps
Download Docker Desktop:
Go to the Docker Desktop for Windows page. Click on Download for Windows. Install Docker Desktop:
Run the downloaded installer. Follow the installation wizard's instructions. During installation, ensure that the option to enable WSL 2 is selected. Enable WSL 2 (if not already enabled):
Open PowerShell as an administrator and run: wsl --set-default-version 2 Install a Linux distribution from the Microsoft Store (e.g., Ubuntu). Start Docker Desktop:
After installation, launch Docker Desktop from the Start menu. You may need to log in or create a Docker account. Verify Installation:
Open PowerShell or Command Prompt and run: docker --version This command should return the installed Docker version. Run a Test Container:
To ensure everything is working, run: docker run hello-world This command downloads a test image and runs it, displaying a confirmation message. Additional Configuration
You may want to configure Docker settings such as resource allocation (CPU, memory) via the Docker Desktop settings menu. Troubleshooting
If you encounter issues, ensure that virtualization is enabled in your BIOS settings and that your Windows version meets the requirements. If you have any questions post them and I will try to answer them.
AWS
You can extract images from a Microsoft Office document with a simple trick.
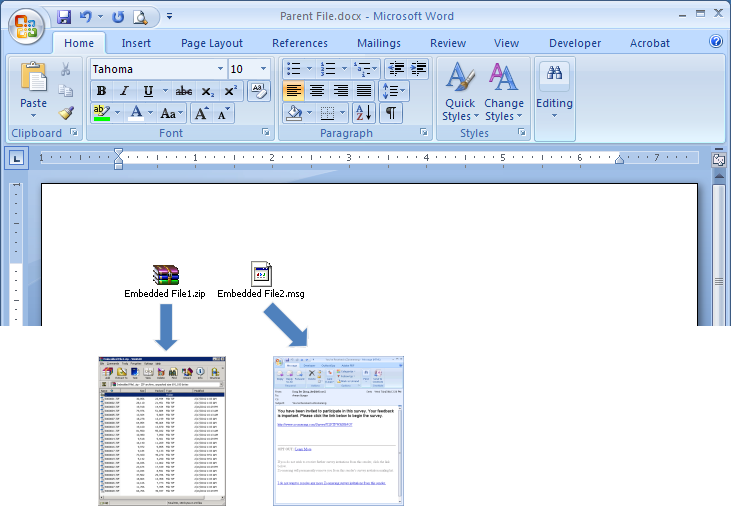
If you have a Word (.docx), Excel (.xlsx), or PowerPoint (.pptx) file with images or other files embedded, you can extract them (as well as the document’s text), without having to save each one separately. And best of all, you don’t need any extra software. The Office XML based file formats–docx, xlsx, and pptx–are actually compressed archives that you can open like any normal .zip file with Windows. From there, you can extract images, text, and other embedded files. You can use Windows’ built-in .zip support, or an app like 7-Zip if you prefer.
If you need to extract files from an older office document–like a .doc, .xls, or .ppt file–you can do so with a small piece of free software. We’ll detail that process at the end of this guide.
How to Extract the Contents of a Newer Office File (.docx, .xlsx, or .pptx)
To access the inner contents of an XML based Office document, open File Explorer (or Windows Explorer in Windows 7), navigate to the file from which you want to extract the content, and select the file.

Press “F2” to rename the file and change the extension (.docx, .xlsx, or .pptx) to “.zip”. Leave the main part of the filename alone. Press “Enter” when you’re done.

The following dialog box displays warning you about changing the file name extension. Click “Yes”.

Windows automatically recognizes the file as a zipped file. To extract the contents of the file, right-click on the file and select “Extract All” from the popup menu.

On the “Select a Destination and Extract Files” dialog box, the path where the content of the .zip file will be extracted displays in the “Files will be extracted to this folder” edit box. By default, a folder with the same name as the name of the file (without the file extension) is created in the same folder as the .zip file. To extract the files to a different folder, click “Browse”.

Navigate to where you want the content of the .zip file extracted, clicking “New folder” to create a new folder, if necessary. Click “Select Folder”.

To open a File Explorer (or Windows Explorer) window with the folder containing the extracted files showing once they are extracted, select the “Show extracted files when complete” check box so there is a check mark in the box. Click “Extract”.

How to Access the Extracted Images
Included in the extracted contents is a folder named “word”, if your original file is a Word document (or “xl” for an Excel document or “ppt” for a PowerPoint document). Double-click on the “word” folder to open it.

Double-click the “media” folder.

All the images from the original file are in the “media” folder. The extracted files are the original images used by the document. Inside the document, there may be resizing or other properties set, but the extracted files are the raw images without these properties applied.
 
How to Access the Extracted Text
If you don’t have Office installed on your PC, and you need to extract text out of a Word (or Excel or PowerPoint) file, you can access the extracted text in the “document.xml” file in the “word” folder.
 
You can open this file in a text editor, such as Notepad or WordPad, but it’s easier to read in a special XML editor, such as the free program, XML Notepad. All the text from the file is available in chunks of plain text regardless of the style and/or formatting applied in the document itself. Of course, if you’re going to download free software to view this text, you might as well download LibreOffice, which can read Microsoft Office documents.
 
How to Extract Embedded OLE Objects or Attached Files]
To access embedded files in a Word document when you don’t have access to Word, first open the Word file in WordPad (which comes built into Windows). You might notice that some of the embedded file icons do not display, but they’re still there. Some of the embedded files might have partial filenames. WordPad does not support all of Word’s features, so some content might be displayed improperly. But you should be able to access the files.
If we right-click on one of the embedded files in our sample Word file, one of the options is “Open PDF Object”. This opens the PDF file in the default PDF reader program on your PC. From there, you can save the PDF file to your hard drive.
 
If WordPad doesn’t have an option for opening your file, make note of its file type here. For example, our second file in this document is a .mp3 file.
Then, go back to your “Files from [Document]” folder and double-click the “embeddings” folder inside the “word” folder.
 
Unfortunately, the file types are not preserved in the filenames. They all have a “.bin” file extension instead. If you know what types of files are embedded in the file, you can probably deduce which file is which by the size of the file. In our example, we had a PDF file and an MP3 file embedded in our document. Because the MP3 file is most likely larger than the PDF file, we can figure out which file is which by looking at the sizes of the files and then rename them using the correct extensions. Below, we’re renaming the MP3 file.
 
Note that not all files will necessarily open using this process–for example, our PDF file opened correctly from WordPad, but we couldn’t get it to open by renaming its .bin file.
Once you’ve extracted the content of the zipped file, you can revert the extension of the original file back to .docx, .xlsx, or .pptx. The file will remain intact and can be opened normally in the corresponding program.
How to Extract Images from Older Office Documents (.doc, .xls, or .ppt)
If you need to extract images from an Office 2003 (or earlier) document, there’s a free tool called Office Image Extraction Wizard that makes this task easy. This program also allows you to extract images from multiple documents (of the same or different types) at once. Download the program and install it (there’s also a portable version available if you’d rather not install it).
Run the program, and the Welcome screen displays. Click “Next”.
 
First, we need to select the file from which you want to extract the images. On the Input & Output screen, click the “Browse” (folder icon) button to the right of the Document edit box.
 
Navigate to the folder containing the document you want, select it, and click “Open”.
 
The folder that contains the selected file automatically becomes the Output folder. To create a subfolder within that folder named the same as the selected file, click the “Create a folder here” check box so there is a check mark in the box. Then, click “Next”.
  
On the Ready to Start screen, click “Start” to begin extracting the images.
  
The following screen displays while the extraction processes.
 
On the Finished screen, click the “Click here to open destination folder” to view the resulting image files.
 
Because we chose to create a subfolder, we get a folder containing the image files extracted from the file.
 
You will see all the images as numbered files.
 
You can also extract images from multiple files at once. To do this, on the Input & Output screen, click the “Batch Mode” check box so there is a check mark in the box.
 
The Batch Input & Output screen displays. Click “Add Files”.
 
On the Open dialog box, navigate to the folder containing any of the files from which you want to extract images, select the files using the “Shift” or “Ctrl” key to select multiple files, and click “Open”.
You can add files from another folder by clicking “Add Files” again, navigating to the folder on the Open dialog box, selecting the desired files, and clicking “Open”.
 
Once you’ve added all the files from which you want to extract images, you can choose to create a separate folder for each document within the same folder as each document into which the image files will be saved by clicking the “Create a folder for each document” check box so there is a check mark in the box.
 
You can also specify the Output folder to be the “Same as each file’s input folder” or enter or select a custom folder using the edit box and “Browse” button below that option. Click “Next” once you have selected the options you want.
 
Click “Start” on the Ready to Start screen.
 
The following screen displays showing the extraction progress.
 
The number of images extracted displays on the Finished screen. Click “Close” to close the Office Image Extraction Wizard.

 If you chose to create a separate folder for each document, you will see folders with the same names as the files containing the images, whichever output folder(s) you specified.

Again, we get all the images as numbered files for each document.

 Now you can rename the images, move them, and use them in your own documents. Just make sure you have the rights to use them legally.
 
allheart55 Cindy E
Using Reset This PC with the Keep My Files option will essentially perform a fresh install of Windows 10 while keeping all your data intact. When you choose this option from the Recovery Drive, it will find and back up all your data, settings, and apps. It will then install a fresh copy of Windows and restore the data, settings, and the apps that were installed with Windows 10. When your PC restarts, just log in with your same username and password and find all your data.
It's important to remember that using Reset This PC with the Keep My Files option does not back up and restore any desktop applications you have installed. The reasoning is that a recently installed desktop application could be the cause of the instability. To help you to remember what desktop applications you had installed, the Reset This PC tool will create a list of those applications that were not saved or restored, so that you can decide whether you want to reinstall them.
What you need
To run Reset This PC with the Keep My Files option, you'll need to have created a Recovery Drive. (See Be prepared: Create a Windows 10 Recovery Drive for a description of that process.) If you are using an optical disc Recovery Drive—or for some reason couldn't use the Back Up System Files To The Recovery Drive option, you can still use Reset This PC with the Keep My Files option. You will just need to have some form of Windows 10 installation media, either USB or DVD.
You can create your own Windows 10 installation media using the Windows 10 Media Creation Tool from Microsoft.
Running Reset This PC with the Keep My Files option
Running Reset This PC with the Keep My Files option is actually easy. It will take some time to complete, but it is a straightforward operation. After your system boots from the Recovery Drive and you select the Troubleshoot > Reset This PC option. You'll select the Keep My Files option, as shown in Figure A.
Figure A
  
Select the Reset This PC tile, then select Keep My Files.
You'll then be prompted to choose the target operating system, as shown in Figure B. At first this seems to be a redundant question. But I suppose if I had a dual-boot configuration, this step would make more sense.
Figure B

 
Select the Windows 10 tile.
 
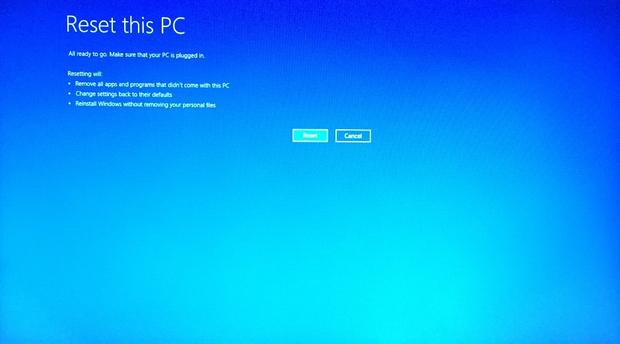
In a moment you'll see the Reset This PC screen, which outlines what this option will provide (Figure C).
 
Figure C
    
 
After you read through the information on the screen, click the Reset button.
 
In case the text in the screenshot is a little fuzzy, I'll list the info here.
 
Resetting will:
 
Remove all apps and programs that didn't come with this PC Change settings back to their defaults Reinstall Windows without removing your personal files To proceed, click the Reset button. (If required, you will be prompted to insert your Windows 10 installation media at this point.) The system will then reboot and begin performing the first stage of the procedure, as shown in Figure D, which includes saving your data files and settings.
 
Figure D


Your system will reboot and start the first stage of the reset procedure.
 
During the next stage of the procedure, the system begins installing Windows, as shown in Figure E. When the percentage count hit 99%, I thought it was ready to finish—but it actually sat at the 99% mark for quite a long time. On my test system, the entire procedure took somewhere around 40 minutes to complete, and of course the system restarted several times.
 
Figure E
   
 
During the second stage of the procedure, the system begins installing Windows.
After the final restart, your Login screen will appear and you'll be able to log in with the same username and password, just like you always have. When you log in for the first time, some of the standard screens associated with Windows 10's first run will appear.
Once everything is complete and you see the desktop, look for an HTML file called Removed Apps. Open the file in Microsoft Edge and you'll see a display similar to the one shown in Figure F.
 
Figure F

 
The Removed Apps file contains a list of all the applications that were removed during the Reset operation.
 
As you can see, this list shows all the applications that were removed from my test system during the Reset operation. At this point, you can begin reinstalling your desktop applications. You can then get right back to work on a stable system.
allheart55 Cindy E
Successor to the antiquated BIOS, the Unified Extensible Firmware Interface (UEFI) adds powerful security tools to post-XP systems.
Ironically, UEFI can also block important repair, recovery, and backup tools that boot from DVDs, CDs, or USB drives.
Windows 8′s tight integration with a PC’s UEFI can be especially problematic when you need to run bootable rescue media. This article will show how to fully master the UEFI boot system on Vista, Windows 7, and Windows 8 systems. At the end, you’ll have the benefits of UEFI security but also know how to bypass its drawbacks.
The many strengths — and weaknesses — of UEFI
From the start, all PCs have contained low-level, semipermanent software that wakes up a system’s components in the correct order and then hands off overall control to whatever operating system is installed.
In old systems, that software was the Basic Input/Output System, known to nearly all PC users as the BIOS. Commonly called “firmware,” the BIOS was specifically designed to be rarely, if ever, changed or updated. Its sole function was to initiate system startup.
As PCs became more powerful, the BIOS became effectively obsolete (more info). A more powerful and flexible replacement for the BIOS — UEFI — first appeared in PCs in 2005. It’s essentially ubiquitous in newer machines. In fact, it’s likely that the PC you’re using right now is UEFI-based.
Most early versions of UEFI, such as those found in Vista PCs, simply mimicked the limited capabilities of the classic BIOS. Then, a slightly more useful UEFI showed up in many machines sold with Win7. Users could, for example, access the UEFI settings while Windows was running; the UEFI could also access multi-terabyte hard drives and allow vendor-specific enhancements.
UEFI truly came into its own with Windows 8. The OS makes extensive use of UEFI capabilities, including security features such as rootkit protection that starts the moment the PC is turned on — long before the operating system or standard anti-malware tools load.
The cost of UEFI security: UEFI can cause major problems. For example, UEFI can make it very hard to boot an alternate OS such as Linux from CDs, DVDs, or flash drives. It can even prevent you from running self-booting system-recovery/-repair tools or anti-malware apps that run outside of Windows — often, the only effective way to root out malware hiding deep within Windows.
Of course, this UEFI drawback typically shows up at the worst possible moment: after a major system crash or other significant PC emergency. Just when you really need to boot from a rescue disc or flash drive, UEFI might throw up a roadblock, preventing access to the tools you need.
To show you how to take control of your PC’s UEFI system, this article is divided into three major parts: a description of the problematic UEFI components, testing your PC’s UEFI implementation, and how to manage the UEFI.
Let’s get started!
UEFI components that might cause boot trouble
There are five elements of UEFI that can defeat your attempts to launch self-booting media. Later in the story, you’ll see how to adjust these items. But first, the following general descriptions will help you understand what the five elements do.
Note: Though Windows 8 can implement all five elements, Vista and Windows 7 systems use subsets of these components. It’s also important to know that each hardware vendor might enable or disable a different set of UEFI features — or call them by different names. I’ve used the most common names below.
Also, when discussing a “Win8 system,” I mean a PC that was designed to run Windows 8. The OS will run on older PCs, but an older UEFI probably won’t have all five components Win8 supports. The same holds for Vista and Win7 machines.
UEFI/CSM Boot: Virtually all Win8 — and many Vista and Win7PCs — can boot with either the generic UEFI system (UEFI Boot) or a compatibility-support module (CSM Boot). CSM Boot emulates old-style BIOS actions for operating systems that require it. In some cases, CSM Boot must be specifically enabled before a PC will boot from a “foreign” operating system or from a device other than the hard drive. What’s more, to use CSM Boot, both UEFI Boot and Secure Boot (see next item) must be disabled. Secure Boot is a Win8-specific, UEFI implementation that prevents unauthorized or unrecognized operating systems from loading. For example, some classic Linux-based repair/recovery discs lack the required security certifications; they won’t boot if a PC is in Secure Boot mode. If you disable Secure Boot, the system reverts to the generic UEFI Boot. Fast Boot is a UEFI option that often varies by vendor and Windows version. In older systems with simpler UEFI implementations, Fast Boot saves a few seconds at startup by skipping several routine hardware checks. With Windows 8, Fast Boot significantly speeds the startup process by overriding and skipping many optional settings. For example, it always boots directly from the primary hard drive — no matter what other boot-order settings you might have set manually.
Typically, Win8′s Fast Boot must be disabled if you want to boot from a standard optical drive, flash drive, network drive, etc. — essentially any source other than your primary hard drive. Trusted Boot is a UEFI module that checks the integrity of the startup software before allowing it to load. Trusted Boot is disabled when you select CSM boot. Early Launch Anti-Malware (ELAM) is a Win8-specific UEFI implementation that’s active when Secure Boot is enabled. Launching early in the initial boot process, ELAM scans all subsequently loaded system-level drivers to ensure they’re not carrying hostile payloads such as rootkits. UEFI/CSM Boot, Secure Boot, and Fast Boot usually can be managed separately by end users; Trusted Boot and ELAM typically cannot.
A fully accurate test for UEFI boot problems
You obviously don’t want to discover UEFI-related boot problems while attempting to recover from a major system failure. It’s far better to test your UEFI settings now — well before an emergency.
The test is safe and simple, and it takes only minutes. You simply create a bootable CD, DVD, or flash drive and then try to boot your system from it.
Though any type of bootable media will do, it’s best to test the UEFI with the combination of media and recovery tool you’ll use if your PC encounters trouble.
For example, all versions of Windows feature a built-in tool to create a bootable repair/recovery disk or flash drive. (Every Windows user should have at least this type of emergency tool on hand.) But there are also many third-party repair/recovery tools available.
The April 10 Top Story, “Emergency repair disks for Windows: Part 1″ lists nine different options for creating repair/recovery tools — most of them are free. (The title states “disks,” but the tools also can be used on flash drives.)
If you don’t already have a known-good emergency disk or drive available, take a few moments to check out the options listed in the above article. Next, create the bootable media of your choice.
XP, Vista, and Windows 7 users can test their emergency boot medium using techniques described in the April 17 Top Story, “Emergency repair disks for Windows: Part 2.” That article also describes how to work around the most common obstacles that can interfere with successfully booting from a repair/recovery tool.
If you can start your XP, Vista, or Win7 system correctly with the boot disk of your choice, great! You’re done!
If, on the other hand, you run into trouble, skip down to this article’s “Inside the UEFI management software” subsection for possible solutions.
Windows 8 users should continue to the next section below for instructions on testing their UEFI configuration — and to adjust its settings, if needed. (The Win8 information in the aforementioned “Emergency repair disks for Windows: Part 2″ is now out of date, due to changes in the operating system itself. Also, many third-party, emergency repair/rescue tools now work with Win8.)
Steps for testing Window 8′s UEFI configuration
 
Preparation and first steps: As with any major change to your PC, start by saving all your work, closing all running apps, and backing up the system.
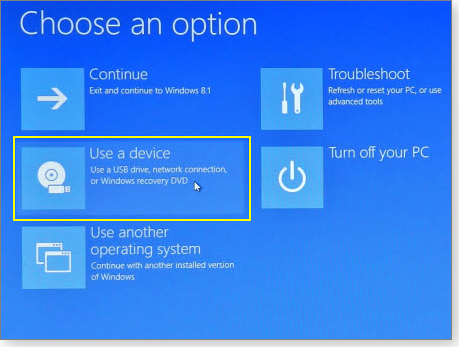
Simplify your PC’s boot hardware as much as possible. Disconnect all potentially bootable external devices — except the one from which you intend to actually boot. For example, if you’re going to boot from a DVD, unplug any unneeded USB drives or flash devices currently connected to your system. Open the Charms bar, click the gear icon (Settings), and then click Change PC settings at the bottom of the bar. On the PC settings page, select Update and recovery. Click Recovery and then, under Advanced startup, click Restart now. (Despite the terminology, your PC will not immediately restart — that’s normal.) The Choose an option page will open. If your PC has UEFI-compatible hardware, you’ll see a Use a device option (see Figure 1).

 
Figure1. If your Win8 PC has UEFI-compatible hardware, the Use a device option gives you easy access to alternate booting methods.
If your PC doesn’t show a Use a device option, don’t worry; just skip ahead to the section of this article labeled “The Advanced alternate booting option.”

The simple “Use a device” option: If it’s available to you, Win8′s Use a device options menu is the easiest way to try booting from alternate media or the network. It automatically makes temporary adjustments to the relevant UEFI settings (including Fast Boot and Boot Order) to allow booting from the device you select.
(Use a device won’t work if the hardware is incompatible with UEFI or the alternate OS is incompatible with Secure Boot.)
Unfortunately, there’s no way to know in advance whether all aspects of your system will work correctly with the Use a device setting — you simply have to try booting your PC with the selected device and see what happens. Here’s how:
Click on Use a device.
Click on the EFI (extensible firmware interface) device that you want to boot from: USB, DVD/CDROM, or network.

 
Figure 2. Select the UEFI-compatible boot device you wish to try — in this example, I've selected a DVD/CD drive.
Click the Reboot button when it’s offered; your PC will shut down and then try to boot from whatever device you selected. Follow the instructions for whatever prompt then appears. For example, if you’re booting from an optical drive, you should press a key when the Press any key to boot from DVD or CD ROM prompt appears.
  Note: If you have trouble booting from a USB-based drive, use a USB 2.0 port (typically denoted by a white or gray connector) if possible. I’ve found USB 2.0 to be more reliable than USB 3.0 (blue connector) in boot operations.
If your system boots from your recovery media, you’re done! Your hardware, media, and software are all UEFI-boot compatible — as they are.
If the boot process fails, you’ll likely get a rather generic error message. For example, if I try to boot my system from a DVD containing a Linux distribution that’s not compatible with Secure Boot, I get the error message: “System doesn’t have any CD/DVD boot option.” It does have that option, of course — the drive was selected in Use a device — but that option is incompatible with Secure Boot.
No matter what error message you receive, if your PC fails to boot via the Use a device option, just bail; reboot normally back to Windows, work your way back to the Choose an option screen, and follow the steps below.

The Advanced alternate booting option: If Use a device isn’t available or fails, your next stop is the Advanced alternate booting option, available under the Troubleshooting menu.
On the Choose an option screen, click Troubleshoot and then Advanced options (Figures 3 and 4).

 
Figure 3. For more advanced boot options, first click Troubleshoot in the Choose an option menu.

  
Figure 4. Next, click the Advanced options to access UEFI settings.
If a UEFI Firmware Settings option (Figure 5) appears, select it. Note: This option might also be under a somewhat different label, such as Change UEFI Settings.
If no such option exists, skip down to the section below labeled “If there’s trouble — or no UEFI menu at all.”
 
Figure 5. If the Advanced options menu includes UEFI Firmware Settings (or something similar), click it.
On the UEFI Firmware Settings screen, select Restart (Figure 6). Your PC will restart and automatically run its built-in UEFI management software.

 
Figure 6. Click Restart to enter your PC's UEFI management software.
Working inside the UEFI management software
UEFI setting pages often look much like classic BIOS screens — and typically work in much the same way. Follow the on-screen directions for navigating to the settings you’re going to change. Next, make the following changes.
On Windows 8 systems, start by disabling Secure Boot. The setting is typically found under Security (see Figure 7), Boot, Authentication, or some similar heading.

 
Figure 7. In Windows 8 only, disable Secure Boot.
 
Next, on Vista, Win7, and Win8 systems that offer it, disable Fast Boot (Figure 8), commonly found under a Boot Speed option. On my system, Boot Speed is under the Advanced heading.

 
Figure 8. To disable Fast Boot, select Normal, Standard, or Slow Boot — or whatever your vendor calls it.
On Win8 and most Win7 and Vista PCs, set the Boot Mode to CSM (Compatibility Support Module). Again, CSM makes your PC behave as if it had the old-school BIOS required by some software.
On my system, this requires three clicks: one to access the Advanced/System Configuration menu (Figure 9), a second to access the Boot Mode settings, and a third to change to CSM Boot (Figure 10).

 
Figure 9. On some systems, the Boot Mode setting is under Advanced/System Configuration.
 
 
Figure 10. Set the Boot Mode to CSM for full software compatibility.
Your PC’s labeling might differ from mine, but the idea is the same: deselect UEFI boot and switch to a traditional BIOS-style CSM boot option.
Now set the boot order; you want your PC to first try the device you selected, upon restart. UEFI boot-order settings are usually under the Boot section (or something similar).
For example, if you want to boot from a DVD/CD drive, change the PC’s boot order so that the optical drive is at the top of the list. Your options will likely look somewhat similar to those shown in Figure 11.
 
 
Figure 11. Move the device you want to boot from to the top of the boot order list. (Shown: ODD, or Optical Disk Drive, is now first.)
When you’re done, save your settings and exit (typically by pressing the F10 key).
Your system will now restart, using a traditional BIOS-type (CSM) boot process. It’ll bypass Secure Boot, skip the Fast Boot shortcuts, and attempt to use whatever device you selected as the first boot device.
If there’s trouble — or no UEFI menu at all
If you know your system has a UEFI, but you can’t find or access its settings, almost all systems offer the alternate, old-school trick of pressing a specific function key during initial boot or using special OEM software. However, whenever possible, it’s best — and safest — to use the menu-access methods described above. It will ensure that Windows and the UEFI system remain in sync.
If you’ve tried everything in this article and still can’t properly control UEFI booting, visit your PC vendor’s online support site and search for instructions specific to your brand and model of PC.
Wrapping up, plus sources of more information
When you’ve successfully booted your system from your emergency repair/recovery tool, make note of any unusual steps you had to take. Store that information with your emergency boot media (DVD/CD, flash drive, whatever), and put both in a safe place. A bit of preparation now could prevent a lot of headaches later — if or when it all hits the fan!
As a last step, undo the changes you made to your UEFI settings, restoring them to their original configuration.
That’s it! You’re done. You can now have the comfort of UEFI’s benefits for routine operation, plus the confidence that you can bypass the UEFI when needed.
 
allheart55 Cindy E
To make a system image backup in Windows 8.1, you must navigate to the File History control panel (and not the main File History interface, which is in the Metro-style PC Settings.) Using Smart Search, be sure to choose the right entry.
In the File History control panel that appears, look in the lower left corner. The option you're looking for is System Image Backup. Click that, and the familiar Create a System Image wizard appears and you're good to go.
To restore an existing system image backup—that is, to restore the entire OS install to a previous point in time—simply plug-in the external drive that contains the backup. Then, navigate to PC Settings, Update and Recovery, Recovery and click the Restart Now button under Advanced Startup. The PC will restart.
At the Choose an Option screen, choose Troubleshoot.
At Troubleshoot, choose Advanced Options.
At the Advanced Options screen, choose System Image Recovery. The PC will restart.
At the System Image Recovery screen, select your user name and then type your password when prompted.
The Re-Image Your Computer wizard will start. In the first page of this wizard, select the correct system image you wish to restore to. Then click Next and step through the wizard to restore your PC to the selected system image backup.
Is this the ideal tool for backing up and restoring Windows 8.1? No. But for those that wish to continue using this tool, it does still work. And of course it's valuable to have around if you have backups from previous versions of Windows.
allheart55 Cindy E
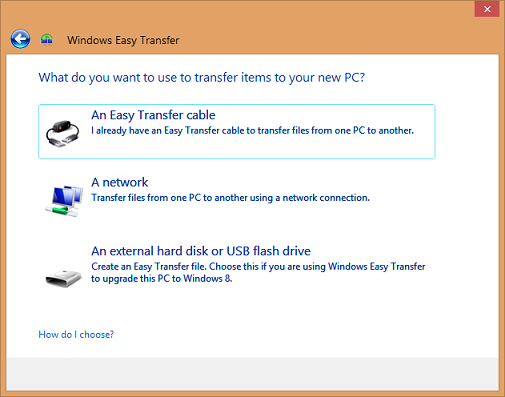
Windows Easy Transfer is a step-by-step guide for transferring files and settings from one computer running Windows to another. It helps you choose what to transfer to your new computer, such as user accounts, Internet favorites, and email contacts. It also helps you decide which method to use and then performs the transfer.
Open Windows Easy Transfer by clicking the Start button  clicking All Programs , clicking Accessories , clicking System Tools , and then clicking Windows Easy Transfer. If asked for confirmation, type the password or provide confirmation.
Windows Easy Transfer helps you transfer personal files, e-mail, data, media , and settings from your old computer to the new one.
User accounts
Files and folders
Program data files and settings
E-mail messages, settings, and contacts
Photos, music, and videos
Windows settings
Internet settings
If you own a removable hard disk, Windows Easy Transfer can copy your data to that disk and then copy data from that disk to your new computer.
Removable hard disk or External Hard Drive
CD and DVD Windows Easy Transfer can use a computer's CD or DVD burner to transfer user data.
Windows Easy Transfer enables you to transfer data to Windows computers running Windows 7, Windows Vista, Windows XP, or Windows 2000.
allheart55 Cindy E